1. Objective
The goal is to build a complete Deep Learning application, including:
-Training a sentiment analysis model.
-Saving the trained model weights.
-Creating a web application that uses the model for realtime predictions.
-Running the app locally
2. Dataset Used
The lab used the Yelp Review Polarity dataset:
-Large collection of text reviews from Yelp.
-Labels: positive or negative.
-Provided in CSV format (train.csv and test.csv).
3. Model Architecture
A simple but effective text classification model:
–Embedding Bag layer: Converts tokens into embeddings and averages them (mean pooling).
–Linear classifier: Outputs two classes: positive / negative.
This design keeps the model fast and suitable for deployment.
4. Training Pipeline
The training script performs:
1. Tokenization and vocabulary creation.
2. Conversion of text to numerical token IDs.
3. Creation of DataLoaders with batching/padding.
4. Training for several epochs on the training set.
5. Monitoring performance on validation set.
6. Final evaluation on the test set.
7. Saving the trained weights as state_dict.pt.
5. Exporting the Model
After training, the model parameters are stored in:
app/state_dict.pt
This file contains the full set of learned weights and is required for prediction inside the app.
6. Building the Web Application
Using Flask to build a simple web interface:
-A home page (/) that displays a form.
-A /predict endpoint that:
1. Receives a user review (text).
2. Loads the model weights.
3. Preprocesses the text.
4. Runs the model to get the prediction.
5. Renders a result page showing the probability and label.
7. Running the Application
To run the app:
1. Activate the virtual environment.
2. Start the Flask server with:
python -m solution.main
Open the browser at:
http://localhost:X0X0/
Successfully ran the app and obtain predictions such as:
“The prediction is X. The review is negative/positive.”
Let’s see the example:
Run the model with the python code:
python train.py
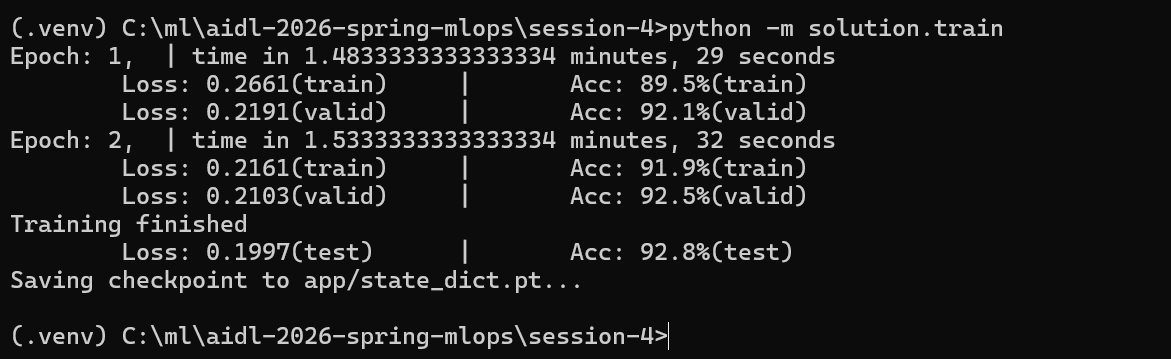
runing completed successfully and the model was saved to:
app/state_dict.pt
with 92.8% test accuracy
1) What each metric means
- Epoch 1 / Epoch 2
One “epoch” = the model has seen all training samples once. You trained for 2 complete passes over the training set.
- time
How long each epoch took end‑to‑end (data loading + forward passes + backprop). - Loss (train/valid/test)
The cross‑entropy loss value. Lower is better. It measures how far the predicted probability distribution is from the true label.
-
- From 0.2661 to 0.2161 (train) and 0.2191 to 0.2103 (valid): loss decreased, which is a healthy sign of learning.
- Final test loss 0.1997 confirms performance holds on completely unseen data.
- Acc (train/valid/test)
Accuracy = percentage of reviews correctly classified as positive/negative.
-
- Train accuracy rose from 89.5% to 91.9%.
- Validation accuracy rose to 92.5% (used during training to monitor generalization).
- Final test accuracy 92.8% is the unbiased estimate of real‑world performance.
- Saving checkpoint to app/state_dict.pt
The model’s learned weights (parameters) are saved in a PyTorch “state dict” file. Your app will load this file to make predictions without retraining.
2) What the training pipeline did (the “solution” code, conceptually)
- Load the Yelp Review Polarity dataset
The code reads train.csv / test.csv (and possibly creates a validation split) containing text reviews and binary labels (positive/negative).
- Preprocess & tokenize
Reviews are tokenized (e.g., lowercased and split into tokens). The script likely builds a vocabulary mapping tokens : integer IDs. (Out‑of‑vocabulary tokens map to a default ID.)
- Numericalize and batch
The token sequences are converted to integer tensors. A custom collate function probably pads or mean‑pools variable lengths so mini‑batches have a consistent tensor shape.
Note:
When training a neural network, you send the data to the model in mini‑batches — small groups of samples (for example, 16 or 32 reviews at a time).
But text reviews have different lengths:
Some reviews have 5 words.
Others have 200 words.
A neural network cannot process a batch where each sequence has a different length because tensors must be rectangular (same number of rows and columns).
So we do something to make them all the same shape in the batch:
We pad or compress the sequences so that:
All inputs in the batch have the same number of tokens
This produces a consistent tensor shape, like:
Batch size = 4
Sequence length = 120 tokens
Tensor shape = [4, 120]
Even if originally:
review 1 = 90 tokens
review 2 = 120 tokens
review 3 = 30 tokens
review 4 = 75 tokens
We pad them (usually with zeros) to the same length, e.g., 120.
Model architecture
- A lightweight text classifier:
-
- Embedding (EmbeddingBag) to convert token IDs into vectors and aggregate them efficiently (average or sum).
- Linear (fully connected) layer on top to produce logits for two classes (pos/neg).
This is fast, simple, and surprisingly strong for polarity tasks.
- Objective & optimizer
-
- Cross‑entropy loss for classification.
- An optimizer like Adam with a small learning rate (e.g., 1e‑3).
- Trains for a few epochs (2).
- Training loop with validation
For each epoch: forward pass TO loss TO backpropagation TO optimizer step.
After the epoch, the code evaluates on a validation set, reporting validation loss/accuracy to check overfitting.
- Final evaluation on test set
Once training finishes, it reports test loss/accuracy (your 92.8%).
- Checkpointing
Saves learned weights to app/state_dict.pt so the web app can load them at startup and serve predictions instantly.
3) How to interpret your results
- Convergence: Loss is steadily decreasing and accuracy is high on both validation and test: learning is stable and not overfitting.
- Quality: 93% test accuracy is very good for a compact model trained quickly.
- Next steps (if you wanted to squeeze more):
-
- Train more epochs (watch validation; stop if it plateaus).
- Increase embedding dimension (e.g., 64 to 128).
- Try n‑gram features if supported by the solution.
- Add simple regularization (dropout) if available.
- Replace the tokenizer with a more robust one (optional).
4) What the saved file is and how the app uses it
- app/state_dict.pt = only the weights (not the full model class).
- At inference time, the app will:
- Load the same model class/architecture.
- Load this state dict into the model.
- Apply the same preprocessing/tokenization used during training.
- Output a label (“positive” / “negative”) and often a probability.
Note 1:
A state dict (“state dictionary”) is a file that contains all the learned weights of a neural network after training.
When you train a model, PyTorch stores the values of:
- the embedding matrix
- the linear layer weights
- biases
- any other trainable parameters
in a Python dictionary called state_dict.
After training, you save these weights:
torch.save(model.state_dict(), «state_dict.pt»)
To use the model later (for prediction in your web app), you must:
- Create the same model architecture again
(same class, same layer sizes, same structure) - Load the saved weights into it
This is what “load this state dict into the model” means:
model = SentimentAnalysisModel(…) # create an empty model
model.load_state_dict(torch.load(«state_dict.pt»))
model.eval() # put in inference mode
Now the model has the exact same parameters it learned during training, so it can make predictions the same way it did before.
By loading the state dict:
- The model has its trained knowledge
- Results match your training accuracy (93%)
- The app works correctly
Note 2:
When you train a neural network, it learns parameters (weights and biases).
These parameters are stored in a dictionary called a state dict.
Example keys inside a state dict:
«embedding.weight»
«linear.weight»
«linear.bias»
Each key contains a tensor with trained numerical values.
Saving the model’s state dict (code python):
torch.save(model.state_dict(), «state_dict.pt»)
Loading the state dict into a model means this:
- Re‑create the same model architecture (empty weights)
- Load the trained weights into it
Python code:
model = SentimentModel(…)
model.load_state_dict(torch.load(«state_dict.pt»))
Now the model behaves exactly like the trained one : it “remembers” everything it learned.
Why this step is important
If you do not load the state dict, the model is fresh and produces random predictions.
Loading the state dict gives you:
- The trained sentiment classifier
- Same accuracy you saw during training (93%)
- Correct predictions in your Flask app
Your app must load the state dict at startup to work correctly.
A checkpoint is a saved snapshot of your model’s learned parameters during or after training.
A checkpoint:
- Allows you to resume training.
- Lets you use the trained model in an app.
- Prevents you from training again every time.
- Stores everything needed for inference (weights).
In our example the checkpoint file is:
app/state_dict.pt
This file contains only the weights, not the architecture.
PyTorch developers recommend saving just the weights, not the whole model object.
Why?
More flexible.
The architecture can be re‑created even if:
- file names change.
- code is refactored.
- the environment is different.
More portable
Saving the whole model ties you to:
- the exact file paths.
- the Python class.
- the module structure.
Saving only the weights avoids these problems.
Smaller file
A state dict is usually much smaller than a full model object.
After loading the checkpoint, before predicting, you should call:
Python code:
model.eval()
This puts the model in evaluation mode, meaning:
- It disables dropout.
- It disables batch normalization updates.
- It prevents unwanted randomness.
- Predictions become stable and deterministic.
In training mode (model.train()), the model behaves differently.
So before serving predictions, always call model.eval().
The app almost certainly contains:
Python code:
model.eval()
just before making predictions.
To summarize:
- State dict = the trained weights of the model.
- Load state dict = restore the model’s learned knowledge.
- Checkpoint = saved weights file (e.g., state_dict.pt).
- We save only the state dict = more portable, cleaner, recommended PyTorch practice.
- model.eval() = switch to inference mode for correct predictions.
5) Quick mental model of the whole flow

 @Yolanda Muriel
